Imagine you have just purchased a beautiful custom-made sign for your new business. That sign is your “Domain Name”—it tells everyone who you are. Now, imagine you have also rented a prime office space in a local building. That office space is your “Web Hosting”—it is the physical place where your business lives and operates.
But there is a problem: the sign is sitting in your garage, and the office is empty. To start welcoming customers, you must physically attach that sign to the front of your office building. In the digital world, this process is known as knowing how to connect hosting with domain.
For a beginner, this can feel like trying to solve a complex puzzle. You might see terms like “DNS,” “Nameservers,” and “IP Addresses” and feel like closing your laptop. Don’t worry! At Skill Making, we specialize in making the technical side of the internet simple for everyone. This guide will walk you through every single click, ensuring your website is live and ready for the world in 2026.
👉 Need Help Connecting Hosting & Domain? 📲 Call/WhatsApp: +917906334941
What Happens When You Connect Hosting and Domain?
Before we dive into the “how,” let’s quickly understand the “what.” When you type a URL like skillmaking.com into your browser, your computer doesn’t naturally know where that website is stored. It needs a map.
When you connect your domain to your hosting, you are essentially creating that map. You are telling the global “Domain Name System” (DNS): “Whenever someone looks for my name, send them to this specific server address”.
Without this connection, your domain is just a name without a home, and your hosting is just a home without an address. By linking them, you allow visitors to actually see the files, images, and content you’ve worked so hard to create.
Different Methods to Connect Hosting with Domain
There isn’t just one way to do this. Depending on where you bought your domain and where your hosting lives, you might use one of three primary methods:
- Method 1: Updating Nameservers: This is the most common and beginner-friendly method. You give your domain registrar a set of “nameservers” provided by your host (e.g., dns1.namecheaphosting.com).
- Method 2: Pointing A Record (IP Address): This is common when you use a Content Delivery Network (CDN) like Cloudflare or have a specialized VPS. You point the domain directly to a numerical IP address (e.g., 69.48.155.118).
- Method 3: Using CNAME Records: Typically used for subdomains or specific services like email and load balancers.
👉 Want a Professional Website Setup? 📞 Call/WhatsApp: +917906334941
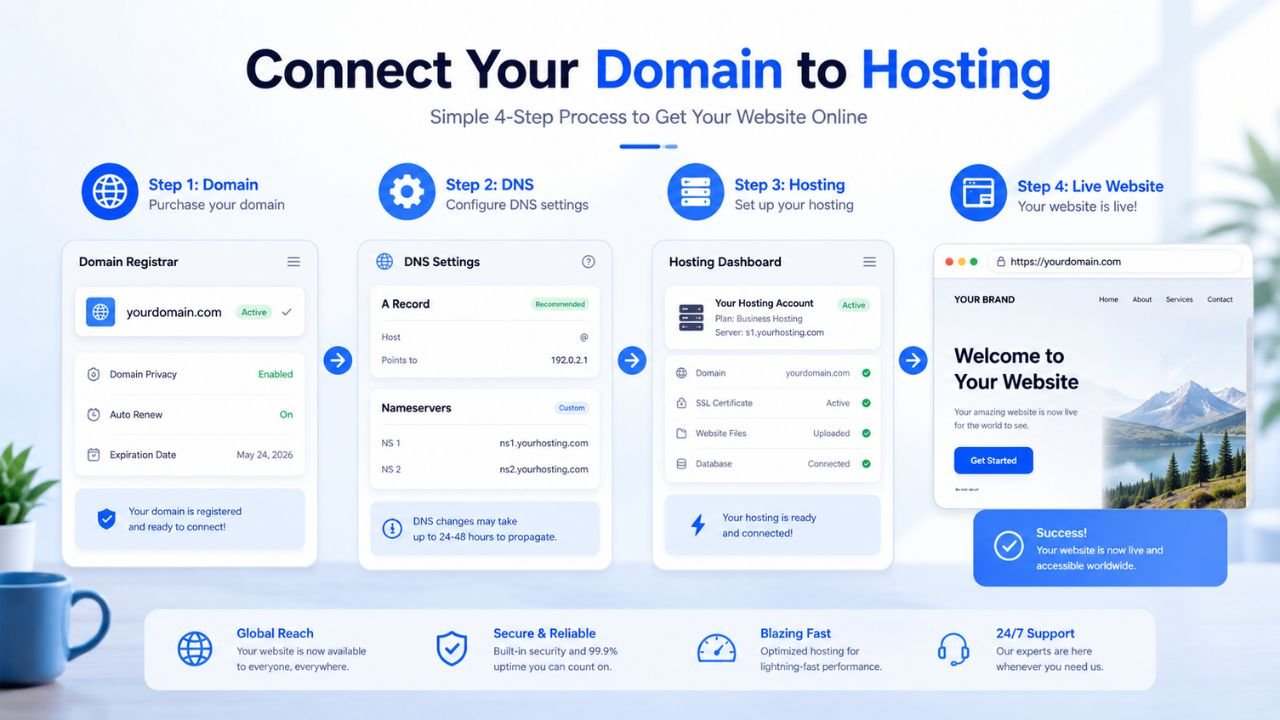
Step-by-Step Guide: Connecting Domain to Hosting
Let’s get into the practical steps. Before you begin, ensure you have two things open in separate browser tabs:
- The dashboard of your Domain Registrar (where you bought the name, like GoDaddy or Namecheap).
- The “Welcome Email” or dashboard from your Hosting Provider (where your website files live).
Method 1: Updating Nameservers (Most Common Method)
This is the “Golden Standard” for most small business owners. When you change your nameservers, you are handing over the “management” of your DNS records to your hosting provider.
Step 1: Find Your Hosting Nameservers
Check your hosting welcome email. Most hosts provide two or more nameservers that look like this:
- ns1.examplehosting.com
- ns2.examplehosting.com
For example, if you are using Namecheap Stellar Plus hosting, your nameservers will likely be dns1.namecheaphosting.com and dns2.namecheaphosting.com.
Step 2: Log Into Your Domain Registrar
Go to the website where you purchased your domain. Look for a section labeled “Domain List,” “My Domains,” or “DNS Management.”
Step 3: Select “Custom DNS”
Find your domain and look for the “Nameservers” section. It is usually set to “Default” by the registrar. Click the dropdown menu and select “Custom DNS” or “I have my own nameservers.”
Step 4: Enter the Nameservers
Copy the nameservers from your hosting provider and paste them into the fields provided by your registrar. Make sure there are no extra spaces at the beginning or end.
Step 5: Save Changes
Click “Save” or the “Checkmark” icon. You will likely see a warning that changes can take up to 48 hours to take effect. This is called DNS Propagation.
Method 2: Pointing A Record / IP Address
Sometimes, you don’t want to change the nameservers. You might want to keep your DNS management with the registrar but simply point the “A Record” to your hosting server. This is common when using a VPS or a specific service like Skill Making’s custom design solutions.
Step 1: Locate Your Server IP Address
In your hosting dashboard (like cPanel or WHM), look for “Account Information” or “Server Details.” You are looking for a string of numbers like 69.48.155.118.
Step 2: Open DNS Settings at Your Registrar
Go to the “Advanced DNS” or “DNS Management” section of your domain registrar.
Step 3: Edit the ‘A Record’
Find the record with the Type “A” and the Host “@”. Click edit and change the “Value” or “IP Address” to your new hosting server IP.
Step 4: Add a Record for ‘www’
Ensure there is another record for “www” that either points to the same IP or is set as a CNAME record pointing to your main domain name.
👉 Get Hosting, Domain & Website Setup Services – 📲 Chat Now: +917906334941
Method 3: Using CNAME Record (for Subdomains)
A CNAME (Canonical Name) record is like an alias. It’s often used when you want a subdomain (like tests.skillmaking.com) to point to a different service, such as a load balancer or a third-party platform.
Step 1: Get the Destination Address
Your service provider will give you a destination URL, such as cd-lb1-1098093161.ap-southeast-1.elb.amazonaws.com.
Step 2: Add a New Record
In your DNS management area, click “Add New Record.”
- Type: CNAME
- Host: Enter your subdomain name (e.g., tests).
- Value: Paste the destination address provided.
- TTL: Leave it as “Automatic” or “30 min.”
How to Verify the Connection is Successful
Once you have hit “Save,” the waiting game begins. However, you don’t have to just sit there and refresh your website. You can use professional tools to see if the internet “map” has updated.
- IntoDNS: Visit intodns.com and type in your domain. It will show you exactly which nameservers are currently active globally.
- Hosts.cx: This tool allows you to view your website on a specific IP address before the DNS has fully propagated across the world.
- Command Prompt: If you are feeling tech-savvy, open your computer’s terminal and type ping yourdomain.com. If the IP address that appears matches your hosting IP, you are connected!
👉 Launch Your Website Faster with Expert Help – 📞 WhatsApp: +917906334941
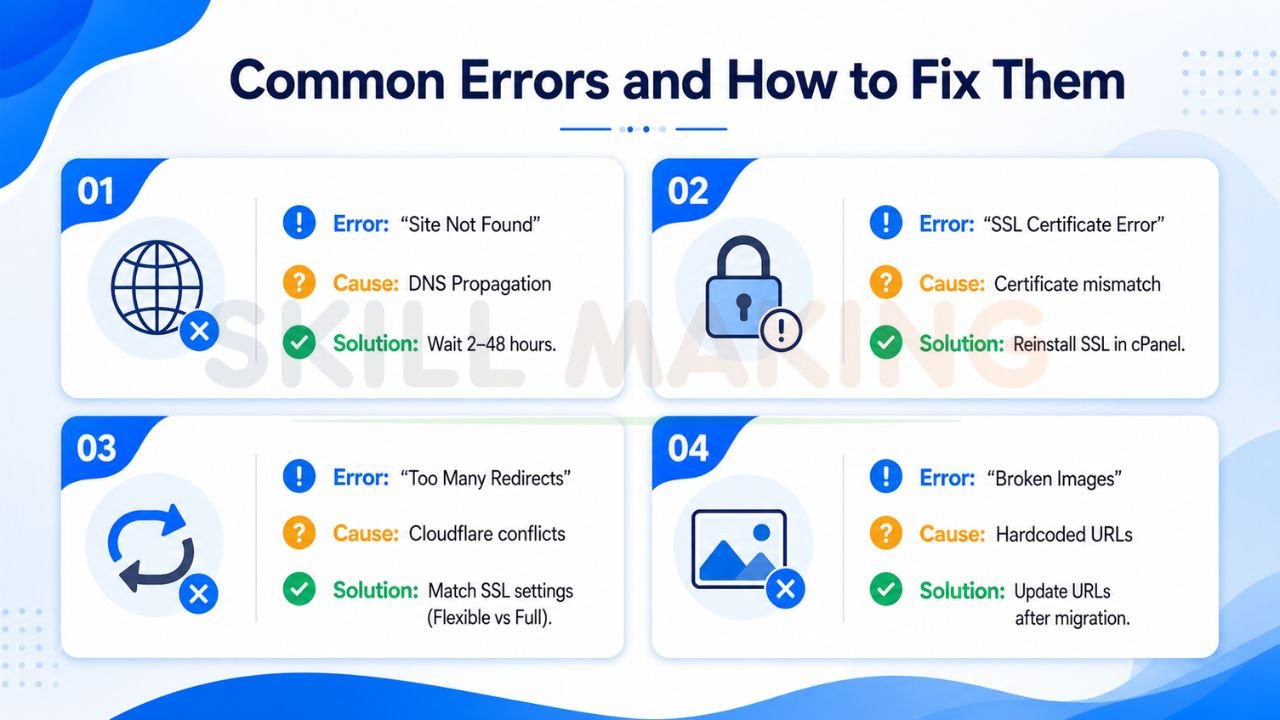
Common Errors and How to Fix Them
Even for experts, things can occasionally go wrong. Here are the most common hurdles:
| Error | Cause | Solution |
|---|---|---|
| “Site Not Found” | DNS Propagation | Wait. It can take 2 to 48 hours for the world to see the change. |
| SSL Certificate Error | Certificate Mismatch | Ensure your SSL is updated to cover the new server. Often, you need to “Reinstall” SSL in cPanel. |
| “Too Many Redirects” | Cloudflare Conflicts | If using Cloudflare, ensure your SSL setting (Flexible vs. Full) matches your hosting setup. |
| Broken Images | Hardcoded URLs | If you migrated a site, your images might still be trying to load from the old server’s URLs. |
How Long Does It Take for Domain to Connect to Hosting?
Technically, the change can happen in minutes. However, the internet is a vast network of servers. These servers need to update their records to reflect your new “address.”
- Standard Time: 2 to 4 hours.
- Worst Case Scenario: Up to 48 hours.
- Pro Tip: Avoid making major changes or launching a marketing campaign during this “propagation period” to ensure no one sees a broken version of your site.
How Skill Making Helps You Set Up Everything Correctly
Learning how to connect hosting with domain is an essential skill, but we understand that as a business owner, your time is better spent growing your brand. Mistakes in DNS settings can lead to missed emails, website downtime, and lost revenue.
At Skill Making, we take the stress out of the digital setup. When you choose our Professional Website Design Services, we don’t just hand you a design. We handle:
- Complete Domain Configuration: We ensure your nameservers and A records are perfectly aligned.
- High-Performance Hosting: We set you up on fast, secure servers like Namecheap or A2 Hosting.
- SSL & Security: We ensure your site has the “Green Lock” from day one so your customers feel safe.
- Email Setup: We make sure your professional business emails are routed correctly through your domain.
Whether you are a contractor in Florida or a small business in India, we ensure your “digital sign” is securely attached to your “digital office”.
👉 Turn Your Website into a Lead-Generating Machine – 📲 Contact: +917906334941
Bonus Tips: Best Practices After Connecting Domain
- Install an SSL Certificate: Never leave your site as “Not Secure.” Most hosts offer free AutoSSL.
- Set Up Professional Email: Use your domain for email (e.g., info@yourbusiness.com) to build instant trust.
- Monitor Performance: Use tools like Google Analytics to track how fast your site loads from its new home.
- Update Your Google Business Profile: Once live, make sure your URL is updated on all your social media and search listings.
Conclusion
Connecting your hosting and domain is the final bridge between your idea and a live, breathing business website. While it involves a few technical steps, following this guide ensures you can navigate the process with confidence.
Remember, you don’t have to do this alone. If you want to skip the technical headache and get a professionally designed, fully connected website that generates leads, Skill Making is here to help.
Ready to launch your professional website without the stress?
- Visit our service page: Skill Making Website Design & Hosting
- WhatsApp us for a free consultation: +91-7906334941
- Explore our blog for more tips: skillmaking.com
Let us build your digital future today!